การใช้ PayPal RESTful กับ Yii Framework 2

Paypal คืออะไร
เข้าใจง่ายๆ Paypal คือธนาคารออนไลน์นั่นเองครับ ซึ่ง Paypal ได้สร้าง API ไว้ให้เราได้เขียนโปรแกรมในการเชื่อมต่อ รับชำระเงิน ตัดบัตรเครดิต (ในไทยยังใช้ไม่ได้) และสามารถถอนเงินเข้าบัญชีธนาคารในบ้านเราได้อย่างง่ายดาย เอาล่ะครับ อาจจะค้นหาเพิ่มเรื่อง Paypal กันต่อได้ แต่ในส่วนนี้ไม่ขอกล่าวรายละเอียดนะครับ ไปดูเรื่องการทำอย่างไรที่จะรับชำระผ่าน RESTful API ของ Paypal กันดีกว่า (เริ่มเข้าเรื่อง)
เตรียมเครื่องไม้เครื่องมือ
เอาล่ะครับสำหรับส่วนแรกนี้หากใครที่ยังไม่ได้ติดตั้ง Yii Framework 2 Advanced Application Template ก็ขอให้ติดตั้งอย่างว่องครับ เราจะใช้ตัว Advanced ในการเรียนรู้ครั้งนี้
https://www.programmerthailand.com/tutorial/post/view?id=16
ที่สำคัญอีกอย่างคือควรที่จะทำ Virtual Host ในเครื่องของเราไว้ก่อนนะครับ เพราะ Paypal จะ Redirect ข้อมูลหลังจากได้ทำการตัดเงินแล้วมาที่ URL ที่เราส่งไป (เพื่อให้สมจริงมากยิ่งขึ้น) สำหรับวิธีการ เข้าไปดูกันได้
https://www.programmerthailand.com/tutorial/post/view?id=18
การใช้ Yii Framework 2 กับ PayPal SDK
เตรียม PayPal Sandbox
ก่อนที่จะทำการใช้งานแบบจริงๆ ก็ต้องทำกระบะทราย (Sandbox) เอาไว้ทดสอบกันก่อนนะครับ ว่าสามารถชำระเงินได้จริงไหม โดยที่ไม่ได้ใช้เงินจริงๆ เป็นเพียงการตั้งค่าเพื่อการทดสอบเท่านั้น โดยเข้า URL
https://developer.paypal.com/developer/applications/
ทำการ Login และสร้าง App ใหม่
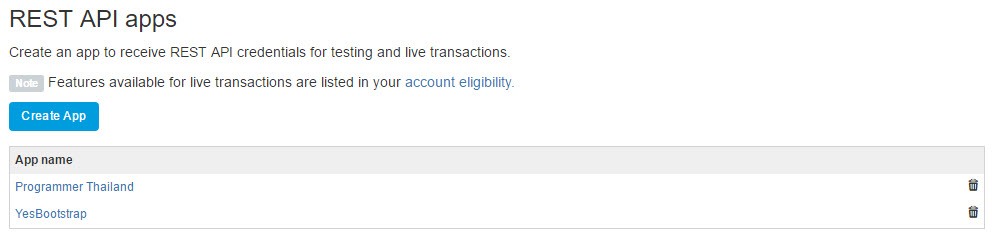
กดปุ่ม Create App
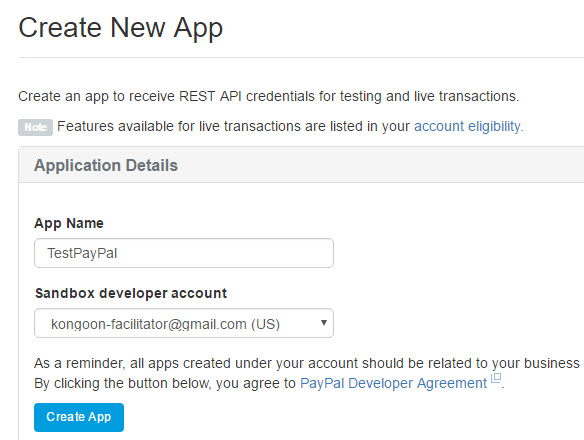
ใส่ชื่อ App ที่ต้องการจากนั้น เลือก Sandbox developer account แล้วกดปุ่ม Create App
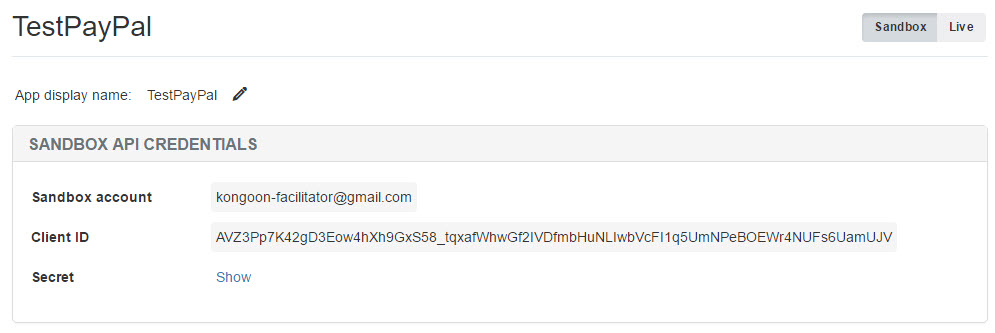
จะได้ App เรียบร้อยจากนั้นสามารถใช้ Client ID และ Secret ได้แล้ว
จัดการ Sandbox User
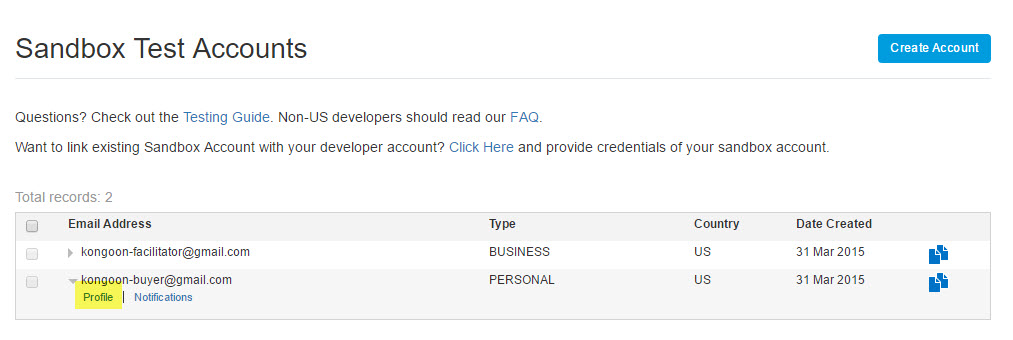
ที่เมนู Sandbox->Accounts
Sandbox User เป็น user สำหรับใช้ในการทดสอบการทำงานโดยเราสามารถบริหารจัดการ ที่สำคัญคือการเปลี่ยนรหัสผ่านโดยกดที่ user ที่ต้องการแล้วเลือก profile ก็สามารถเปลี่ยนรหัสผ่านใหม่ได้แล้ว
ติดตั้ง kongoon/yii2-paypal
https://packagist.org/packages/kongoon/yii2-paypal
โดยพิมพ์คำสั่ง composer ดังนี้
composer require kongoon/yii2-paypal
เตรียมตารางเก็บ Transaction
ใช้คำสั่ง migration ในการสร้างไฟล์ migration เพื่อสร้างตารางดังนี้
yii migrate/create create_transction_paypal
จะได้ไฟล์ ประมาณนี้ (ตัวอักษรและตัวเลขข้างหน้าอาจต่างกัน)
m160411_160737_create_transaction_paypal.php
ทำการแก้ไขไฟล์ให้มี field ต่างๆ ดังนี้ เอะ ลืมบอกไปว่าไฟล์นี้อยู่ที่ console\migrations
<?php

use yii\db\Migration;

class m160411_160737_create_transaction_paypal extends Migration
{
    public function up()
    {
        $this->createTable('transaction_paypal', [
            'id' => $this->primaryKey(),
            'user_id' => $this->integer(),
            'payment_id' => $this->string(100),
            'hash' => $this->string(100),
            'complete' => $this->integer(1),
            'create_time' => $this->string(50),
            'update_time' => $this->string(50),
            'product_id' => $this->integer(11)
        ]);
    }

    public function down()
    {
        $this->dropTable('transaction_paypal');
    }
}
จากนั้นเรียกคำสั่งในการสร้างตารางผ่านการ migration ดังนี้
yii migrate
ก็จะได้ตาราง transaction_paypal ในฐานข้อมูลเรียบร้อยแล้ว
ตั้งค่า kongoon paypal
ทำการตั้งค่าใน common/config/main.php โดยเพิ่ม index paypal ในส่วนของ components ดังนี้
(ตรงนี้สามารถทำเฉพาะ frontend/backend ก็ได้ แต่ผมทำใน config ของ common เพื่อให้ใช้ได้ทั้ง 2 ฝั่งเลยครับ)
<?php
return [
    'vendorPath' => dirname(dirname(__DIR__)) . '/vendor',
    'components' => [
        'cache' => [
            'class' => 'yii\caching\FileCache',
        ],
        'paypal' => [
            'class' => 'kongoon\yii2\paypal\Paypal',
            'clientId' => 'YOUR_CLIENT_ID', // เอา Client ID มาใส่ตรงนี้ล่ะ
            'clientSecret' => 'YOUR_SECRET', // เอา Secret มาใส่ตรงนี้ล่ะ
            'isProduction' => false,
            // This is config file for the PayPal system
            'config' => [
                'http.ConnectionTimeOut' => 30,
                'http.Retry' => 1,
                'mode' => 'sandbox', // development (sandbox) or production (live) mode
                'log.LogEnabled' => YII_DEBUG ? 1 : 0,
                //'log.FileName'           => '@runtime/logs/paypal.log',
                'log.LogLevel' => 'FINE',
            ]
        ],
    ],
];
สร้างปุ่มชำระเงิน
สร้างปุ่มชำระเงิน ในกรณีนี้คือซื้อสินค้ารายชิ้น โดยเลือกสินค้าที่ชอบแล้วชำระเงินผ่าน Paypal ทันที ไม่มีระบบตระกร้า
<?= Html::a('Buy now for $<span id="price">' . $model->price."</span>", ['/payment/paypal', 'id' => $model->id], ['class' => 'btn btn-success btn-lg btn-block btn-capital'])?>
สร้าง PaypalController
ทำการสร้าง PaypalController โดยใช้ Gii ให้มี action ดังต่อไปนี้
index,error,cancel,success,paypal,pay
และจะได้ไฟล์ใน frontend/controllers/PaypalController.php
<?php

namespace frontend\controllers;

class PaypalController extends \yii\web\Controller
{
    public function actionCancel()
    {
        return $this->render('cancel');
    }

    public function actionError()
    {
        return $this->render('error');
    }

    public function actionIndex()
    {
        return $this->render('index');
    }

    public function actionPay()
    {
        return $this->render('pay');
    }

    public function actionSuccess()
    {
        return $this->render('success');
    }

}
แก้ไข PaypalController actionPaypal()
ทำการ use Class ที่จำเป็น
use PayPal\Api\Payer;
use PayPal\Api\Details;
use PayPal\Api\Amount;
use PayPal\Api\Transaction;
use PayPal\Api\Payment;
use PayPal\Api\RedirectUrls;
use PayPal\Api\PaymentExecution;
use PayPal\Exception\PayPalConnectionException;

use common\models\Product;
ทำการแก้ไข actionPaypal($id=null) โดย $id คือ id ของ สินค้า (Product)
public function actionPaypal($id=null) {
        $product = Product::findOne(['id'=>$id]);
        $payer = new Payer();
        $details = new Details();
        $amount = new Amount();
        $transaction = new Transaction();
        $payment = new Payment();
        $redirectUrls = new RedirectUrls();

		//Payer
        $payer->setPaymentMethod('paypal');

		//Details
        $details->setShipping('0.00')
                ->setTax('0.00')
                ->setSubtotal($product->price);
		//Amount
        $amount->setCurrency('USD')
                ->setTotal($product->price)
                ->setDetails($details);
		//Transaction
        $transaction->setAmount($amount)
                ->setDescription($product->name);

		//Payment
        $payment->setIntent('sale')
                ->setPayer($payer)
                ->setTransactions([$transaction]);

		//Redirect URLs
        $redirectUrls->setReturnUrl('http://programmerthailand.dev/payment/pay/?approved=true')
                ->setCancelUrl('http://programmerthailand.dev/payment/cancel/?approved=false');
        $payment->setRedirectUrls($redirectUrls);
        try {
            $payment->create(Yii::$app->paypal->getApiContext());

            $hash = md5($payment->getId());
            Yii::$app->session['paypal_hash'] = $hash;

            $transactionPaypal = new TransactionPaypal;
            $transactionPaypal->user_id = Yii::$app->user->getId();
            $transactionPaypal->payment_id = $payment->getId();
            $transactionPaypal->product_id= $product->id;
            $transactionPaypal->create_time = '-';
            $transactionPaypal->update_time = '-';
            $transactionPaypal->hash = $hash;

            $transactionPaypal->save();

        } catch (PayPalConnectionException $ex) {
            $this->redirect('error');
        }
        foreach ($payment->getLinks() as $link) {
            if ($link->getRel() == 'approval_url') {
                $redirectUrl = $link->getHref();
            }
        }
        $this->redirect($redirectUrl);

		//var_dump($payment->getLinks());
		//print_r(Yii::$app->paypal);
        return $this->render('paypal');
    }
แก้ไข PaypalController actionPay()
ทำการแก้ไข actionPay() ซึ่งจะรับ 2 ค่าเข้ามานั่นคือ approved และ PayerId เพื่อนำไปอ้างอิงในตาราง transaction_paypal ต่อไป
public function actionPay($approved=null,$PayerID=null) {
        if($approved==='true'){
            $transactionPayment = TransactionPaypal::findOne(['hash'=>Yii::$app->session['paypal_hash']]);
            //var_dump($transactionPayment);
            // Get the Paypal payment

            $payment = Payment::get($transactionPayment->payment_id,Yii::$app->paypal->getApiContext());
            //var_dump($payment);

            $execution = new PaymentExecution();
            $execution->setPayerId($PayerID);
            //Execute Paypal payment (charge)
            $payment->execute($execution,Yii::$app->paypal->getApiContext());

            // Update transaction
            $transactionPayment->complete = 1;
            $transactionPayment->create_time = $payment->create_time;
            $transactionPayment->update_time = $payment->update_time;
            $transactionPayment->save();

            Yii::$app->session->remove('paypal_hash');

            //SEND Email
            /*$text = '
                You will download sourcode'.$transactionPayment->product->name.' in https://programemrthailand.com/account/download
            ';
            Yii::$app->mail->compose(['html' => '@app/mail-templates/html-email-01'])
                ->setFrom('support@programemrthailand.com')
                ->setTo($transactionPayment->user->email)
                ->setSubject('YesBootstrap - '.$transactionPayment->product->name)
                ->send();
            */

            return $this->redirect(['success']);
        }else{//if approved !== true
            return $this->redirect(['cancel']);
        }

    }
เอาล่ะครับ สุดท้ายใน actionSuccess() คือ เมื่อการชำระเสร็จสมบูรณ์ และ actionCancel() เมื่อมีการยกเลิก ก็ปรับแต่ง view ให้สวยงามได้เลยครับ
ทดสอบ
คลิกที่ปุ่มสำหรับชำระเงิน

จะปรากฏหน้า Web Application ของ Paypal
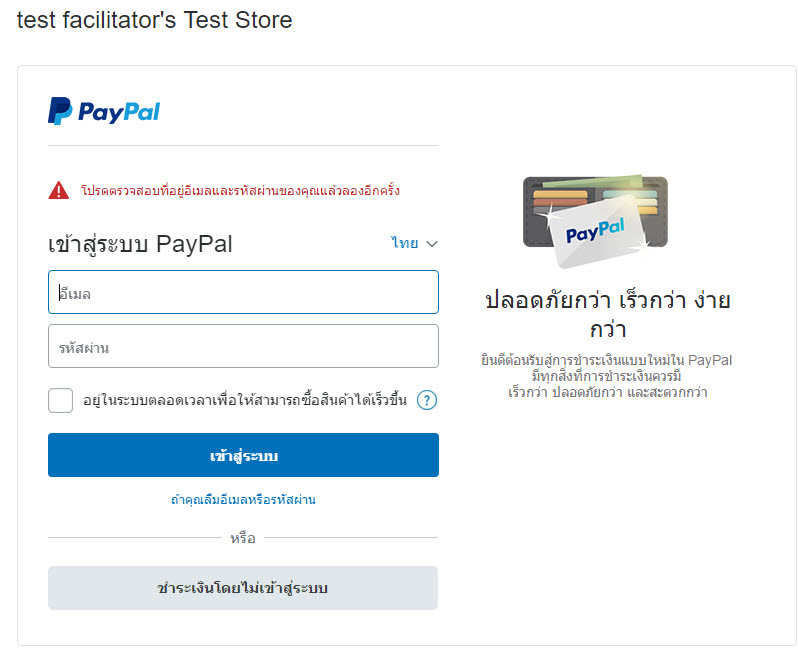
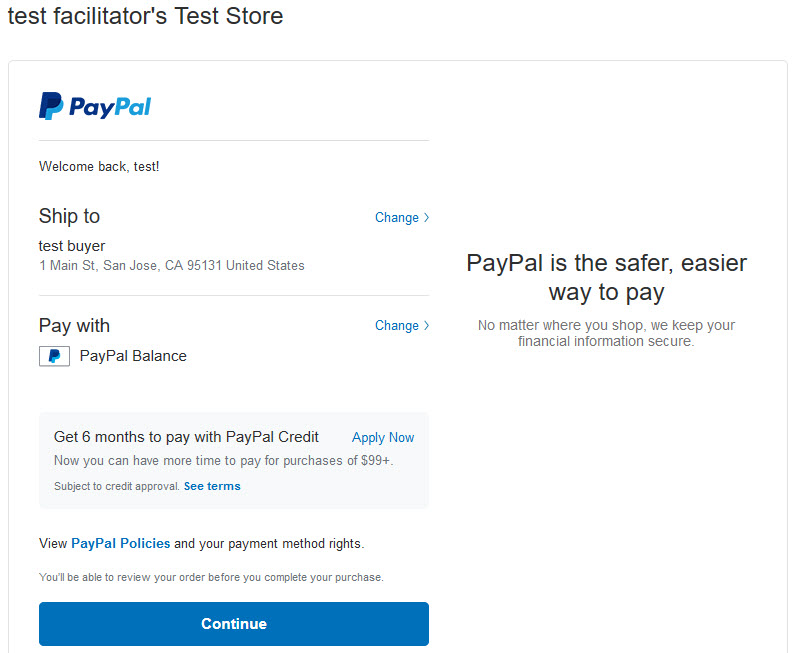
กรอก email และ password จาก Sandbox account กดปุ่ม เข้าสู่ระบบ จะปรากฎรายละเอียดการสั่งซื้อ กดปุ่ม Continue
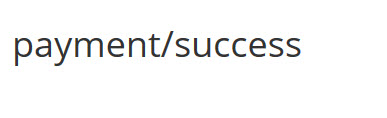
ระบบจะ redirect มาที่ actionPay() และจะทำงานตามที่เขียนโปรแกรมเอาไว้ และจะ redirect ไปที่ actionSuccess()
เมื่อเปิดดูในตาราง transaction_paypal ก็จะมีข้อมูลเกิดขึ้นดังนี้

สรุป
การใช้ Paypal ในการบริหารจัดการการรับชำระเงินนั้นเราสามารถทำได้ผ่าน RESTful API แต่ก็ยังมีบาง Feature ที่ในประเทศเรายังไม่สามารถใช้งานได้ เช่น Direct Credit Card Payment เป็นต้น
สำหรับการชำระผ่าน RESTful API ผ่าน Yii Framework 2 ก็สามารถทำได้ปกติ
ก็หวังว่าจะเป็นประโยชน์สำหรับผู้ที่ต้องการสร้าง Web Application ในการรับชำระเงินผ่านระบบ Paypal ด้วย Yii Framework 2 นะครับ
ความคิดเห็น (0)
ยังไม่มีความคิดเห็น — เริ่มคุยเป็นคนแรก ถามสิ่งที่สงสัย หรือแชร์ประสบการณ์ของคุณ