การติดตั้ง Yii Framework 2 บน Windows Server ในที่นี้ใช้ Windows Server 2008 ในการติดตั้ง ใช้ฐานข้อมูล Microsoft SQL Server และใช้ IIS เป็น Web Server
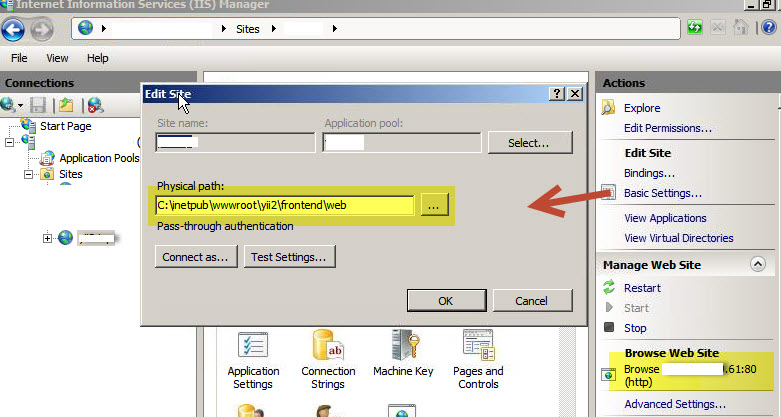
เริ่มจากการตั้งค่า IIS ด้วย Internet Information Services Manager จากนั้นคลิกเลือก Sites หากยังไม่มีให้สร้างใหม่ จากนั้นกด Basic Settings ให้ระบุ Physical path: ไปยัง frontend/web ดังรูป

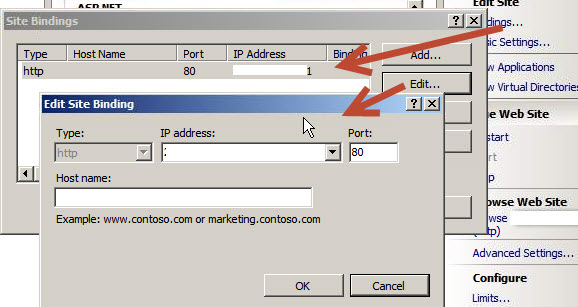
กดปุ่ม OK จากนั้นกดที่ Bindings... และกดปุ่ม Edit... เพื่อตั้งค่า โดยระบุ IP และ Port ดังนี้

จากนั้นกดปุ่ม OK แล้วทดสอบ เข้า http://your.ip.address/ จะปรากฏหน้า Web Application Yii2
หมายเหตุ ต้องติดตั้ง PHP สำหรับ IIS ก่อน
การติดตั้ง PHP บน IIS
ดาวน์โหลด PHP ได้จาก www.php.net ในที่นี้จะใช้ Version PHP5.4 เพื่อทดสอบ จากนั้นแตกไฟล์ไว้ที่
C:\Program Files (x86)\PHP\v5.4
เปลี่ยนชื่อ php.ini.production เป็น php.ini เปิดไฟล์ php.ini และตั้งค่าเพิ่มเติมดังนี้
fastcgi.impersonate = 1
fastcgi.logging = 0
cgi.fix_pathinfo=1
cgi.force_redirect = 0
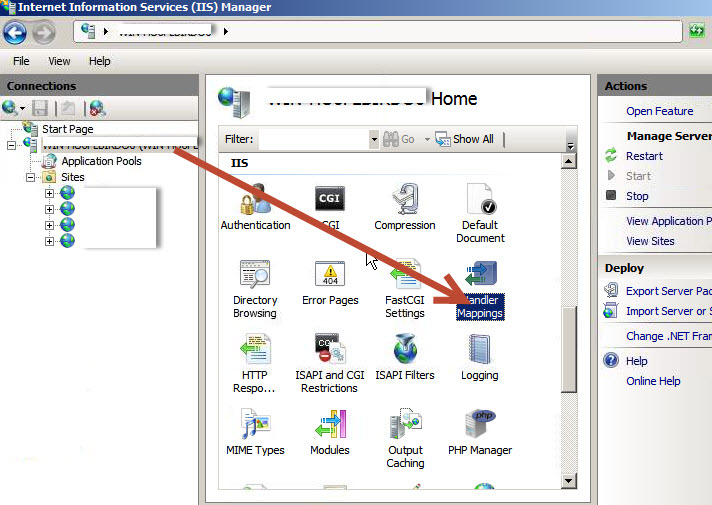
เปิด Internet Information Services (IIS) เพื่อตั้งค่า

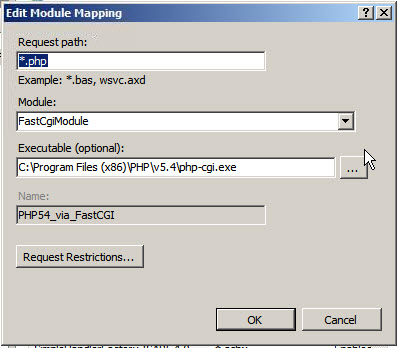
จากนั้น ทำการ Add Module Mapping ดังนี้

หากต้องการใช้งาน urlManager สามารถใช้ได้โดยตั้งค่าใน frontend/config/main.php ดังนี้
'components' => [
//...
        'urlManager' => [
            'enablePrettyUrl' => true,
            'showScriptName' => false,
            'rules' => [
                '<controller:\w+>/<id:\d+>' => '<controller>',
                '<controller:\w+>/<action:\w+>/<id:\d+>' => '<controller>/<action>',
                '<controller:\w+>/<action:\w+>' => '<controller>/<action>',
            ],
        ],
//...
],
สร้างไฟล์ web.config ใน frontend/web ดังนี้
<?xml version="1.0" encoding="UTF-8"?>
<configuration>
    <system.webServer>
        <rewrite>
            <rules>
                <rule name="apache imported">
                    <match url="." ignoreCase="false" />
                    <conditions logicalGrouping="MatchAll">
                        <add input="{REQUEST_FILENAME}" matchType="IsFile" ignoreCase="false" negate="true" />
                        <add input="{REQUEST_FILENAME}" matchType="IsDirectory" ignoreCase="false" negate="true" />
                    </conditions>
                    <action type="Rewrite" url="index.php" />
                </rule>
            </rules>
        </rewrite>
    </system.webServer>
</configuration>


ความคิดเห็น